
15 Grinch Nail Ideas That Are Cute, Festive & Full of Christmas Mischief
15 Grinch Nail Ideas That Are Cute, Festive & Full of Christmas Mischief
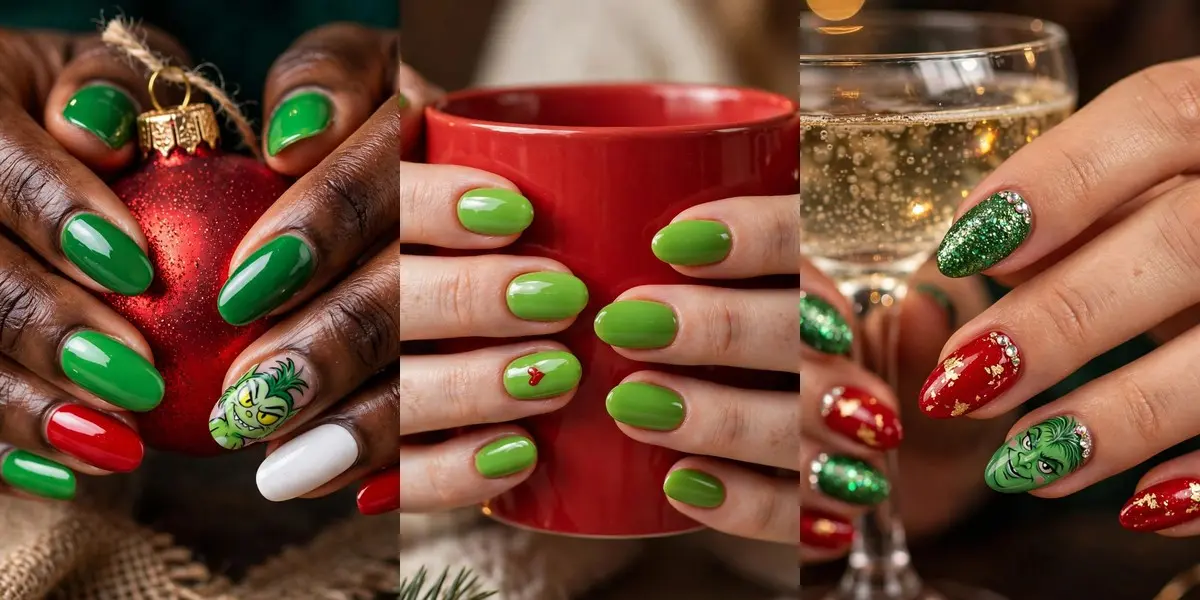
Some Christmas manicures are elegant — and some are pure mischief. These grinch nail ideas are firmly the second kind: that unmistakable bright green, sly little painted faces, tiny red hearts and just enough sparkle to make even the grouchiest heart grow three sizes by Christmas morning.
Inside you will find fifteen ways to wear the theme, from a simple all-green manicure you can paint in ten minutes to full storybook scenes with stockings, string lights and presents. There are French tips, ombre fades, cozy sweater knits and a pink twist for anyone who finds the classic red-and-green a little predictable.
Every design here works with regular polish at home, and most scale up or down easily — keep the art on one or two accent nails for everyday wear, or go all in for parties. If you love playful holiday sets in general, our roundup of unique Christmas nail ideas is full of equally fun company for this green troublemaker.
Pick your favorites, note the colors before you start, and give detailed faces the biggest canvas you have — usually the ring finger or thumb. A fine brush, a dotting tool and a good glossy top coat are genuinely all the equipment this list asks for.
Table of Contents
- 1. Classic Grinch Green Nails
- 2. Grinch French Tip Nails
- 3. Grinch Face Accent Nails
- 4. Grinch and Max Christmas Nails
- 5. Grinch Heart Nails
- 6. Grinch Christmas Tree Nails
- 7. Grinch Candy Cane Nails
- 8. Glitter Grinch Nails
- 9. Grinch Ombre Nails
- 10. Pink and Grinch Nails
- 11. Grinch Sweater Nails
- 12. Grinch Stole Christmas Nails
- 13. Cute Grinch Short Nails
- 14. Red and Green Grinch Nails
- 15. Grinch Christmas Party Nails
- Styling Tips
- Common Mistakes to Avoid
- The Best Shapes and Finishes for Grinch Nails
- Frequently Asked Questions
1. Classic Grinch Green Nails
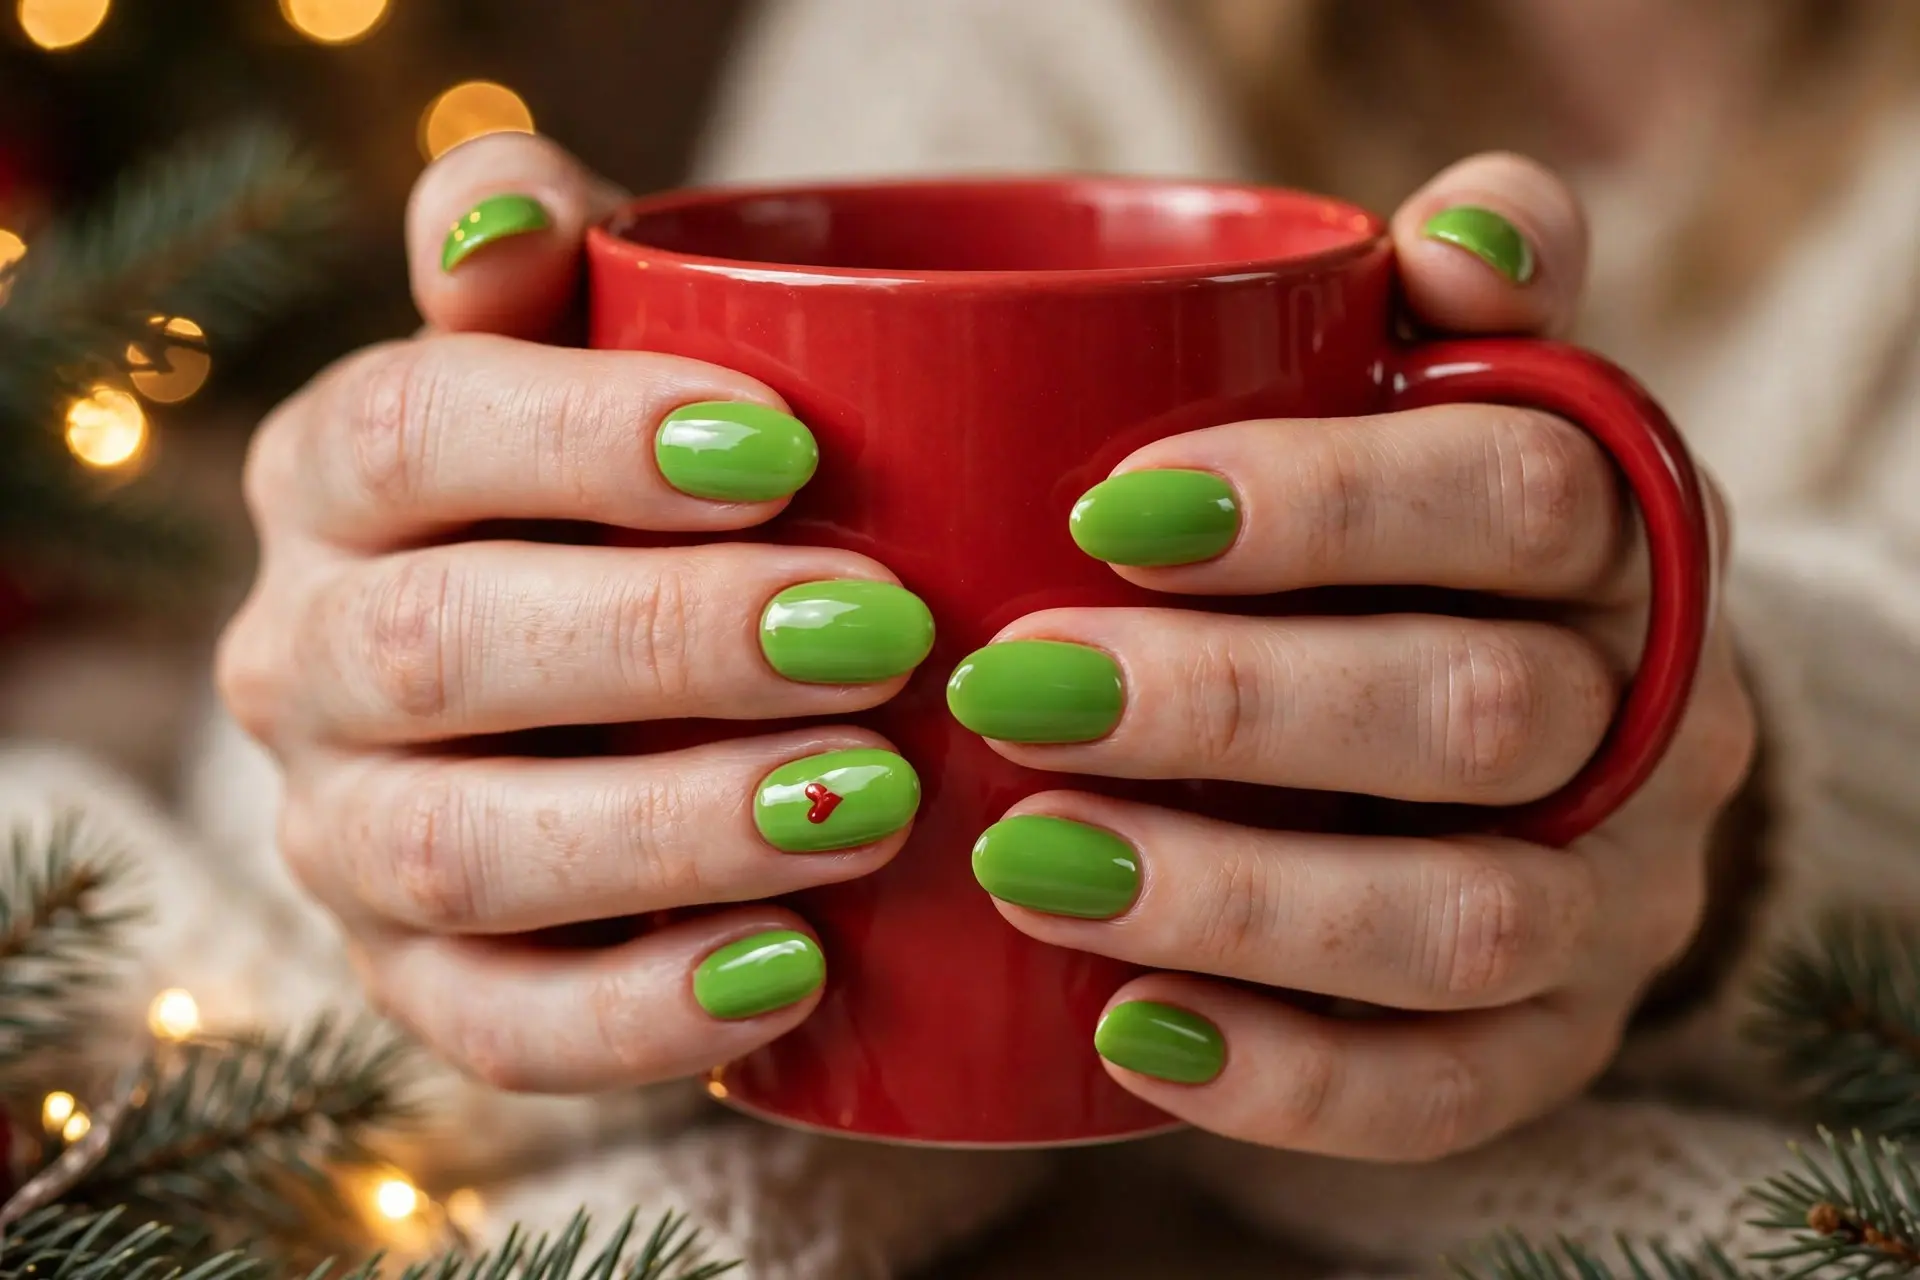
The simplest way into the theme is also the boldest: every nail painted in that bright, yellow-leaning green the character is famous for. On its own the color does all the talking — it is cheerful, a little bit cheeky, and instantly recognizable across a room full of red manicures.
Keep the finish high-gloss so the green reads juicy rather than flat, and let one ring nail carry a tiny red heart as a quiet nod to the story. That single detail turns a plain green set into a themed one without any real nail-art skill.
It works at almost any length, though a medium almond or oval shows off the color best. Two thin coats over a ridge-filling base will give you the smooth, even coverage this look depends on.
Tip: Bright greens can stain natural nails — never skip the base coat, and remove the polish with a foil soak if the color lingers.
2. Grinch French Tip Nails
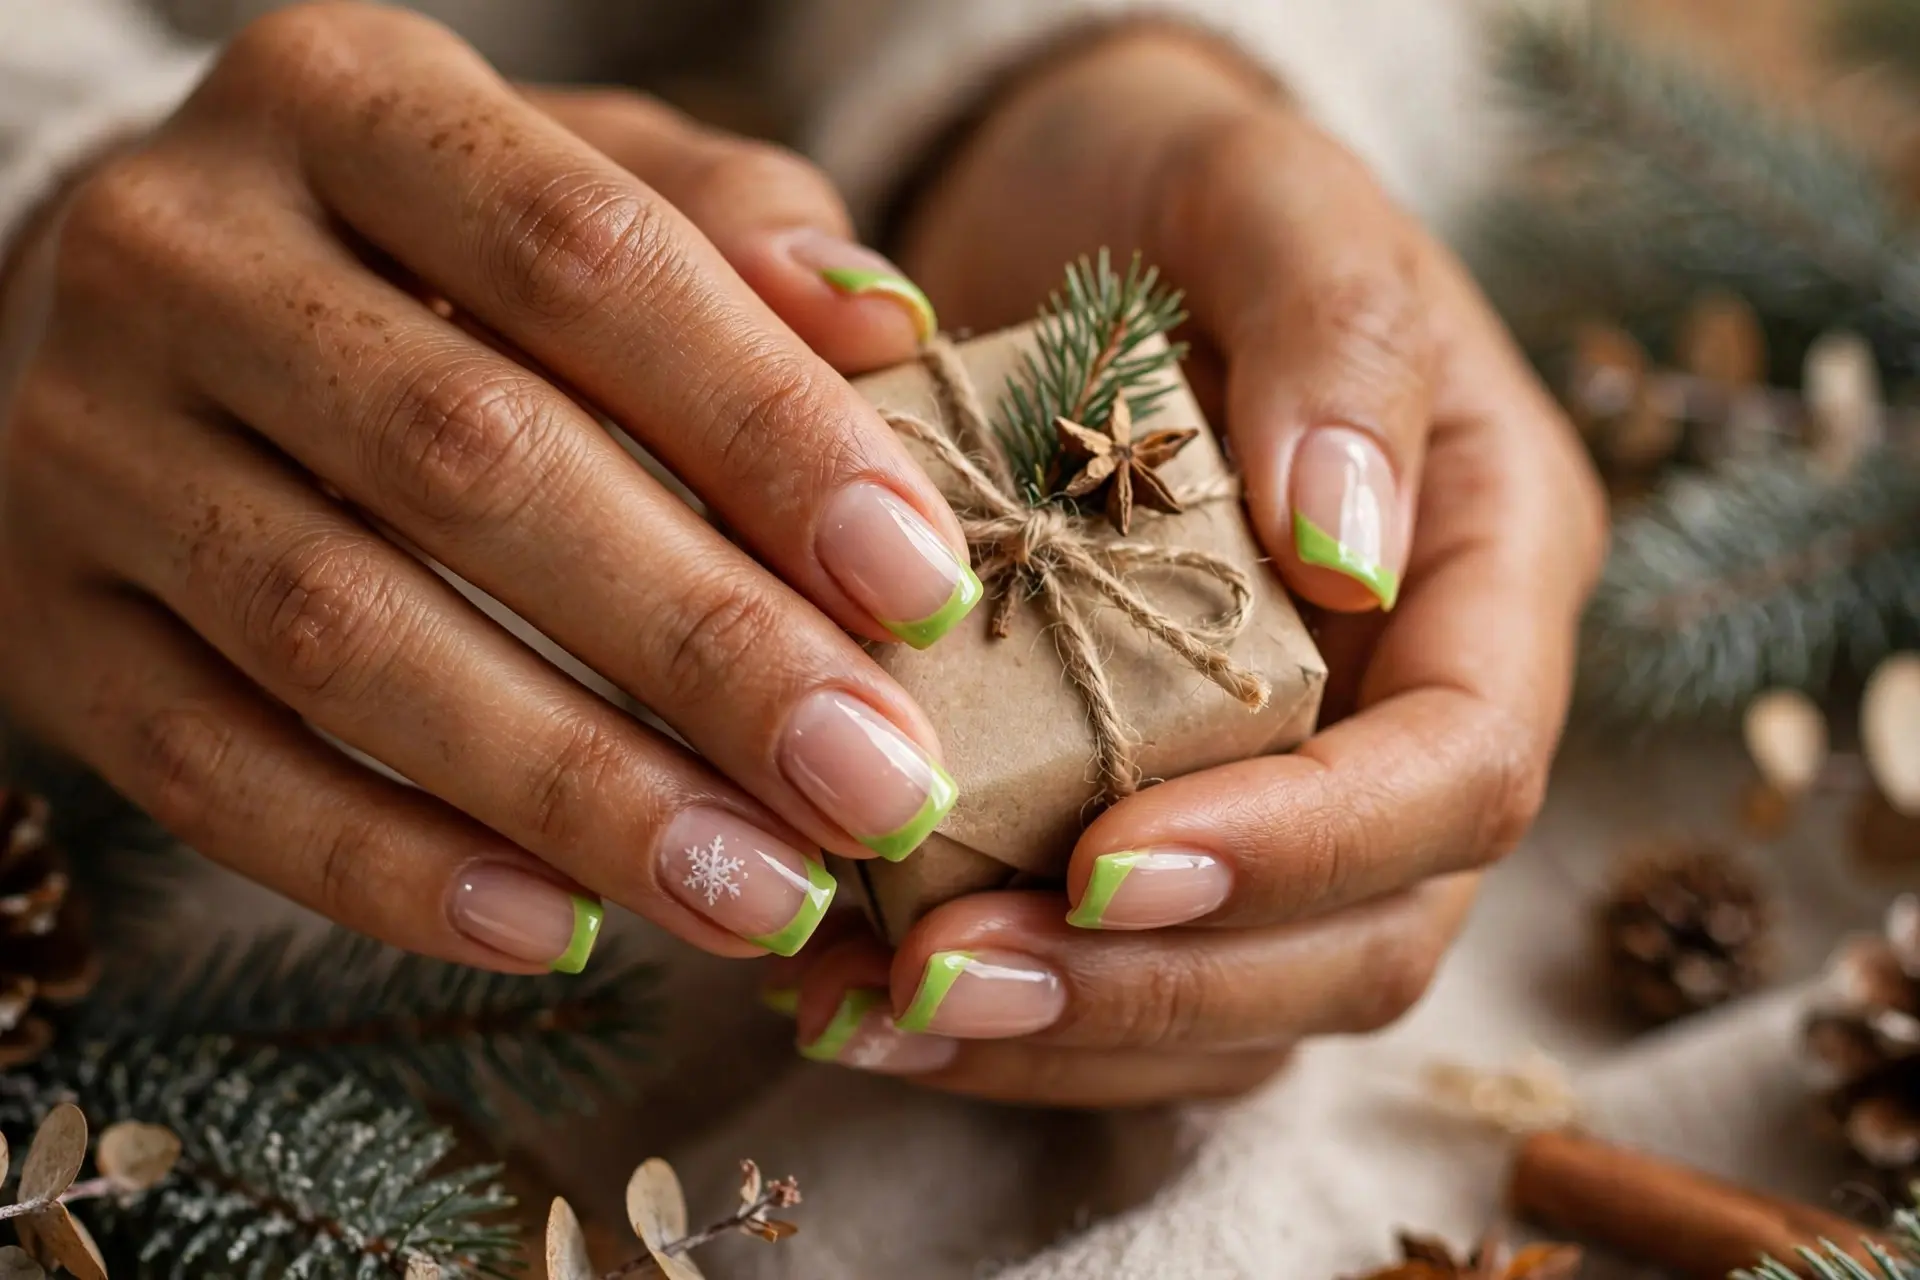
A French manicure gets a mischievous makeover when the white tips are swapped for Grinch green. The sheer nude base keeps everything clean and grown-up, while the green smile lines bring the holiday theme in a way you can wear to work all December.
Add one tiny white snowflake on a ring nail if you want a whisper more detail, and stop there — the charm of this design is its restraint. It pairs with everything in a winter wardrobe and never fights your outfit for attention.
Because the color sits only at the tips, grow-out is barely noticeable, which makes this one of the longest-wearing designs in the list. It is also the quickest to touch up before a party.
Tip: Use French-tip guides or a silicone stamper for crisp green tips; freehand lines on a short nail bed can look wobbly.
3. Grinch Face Accent Nails
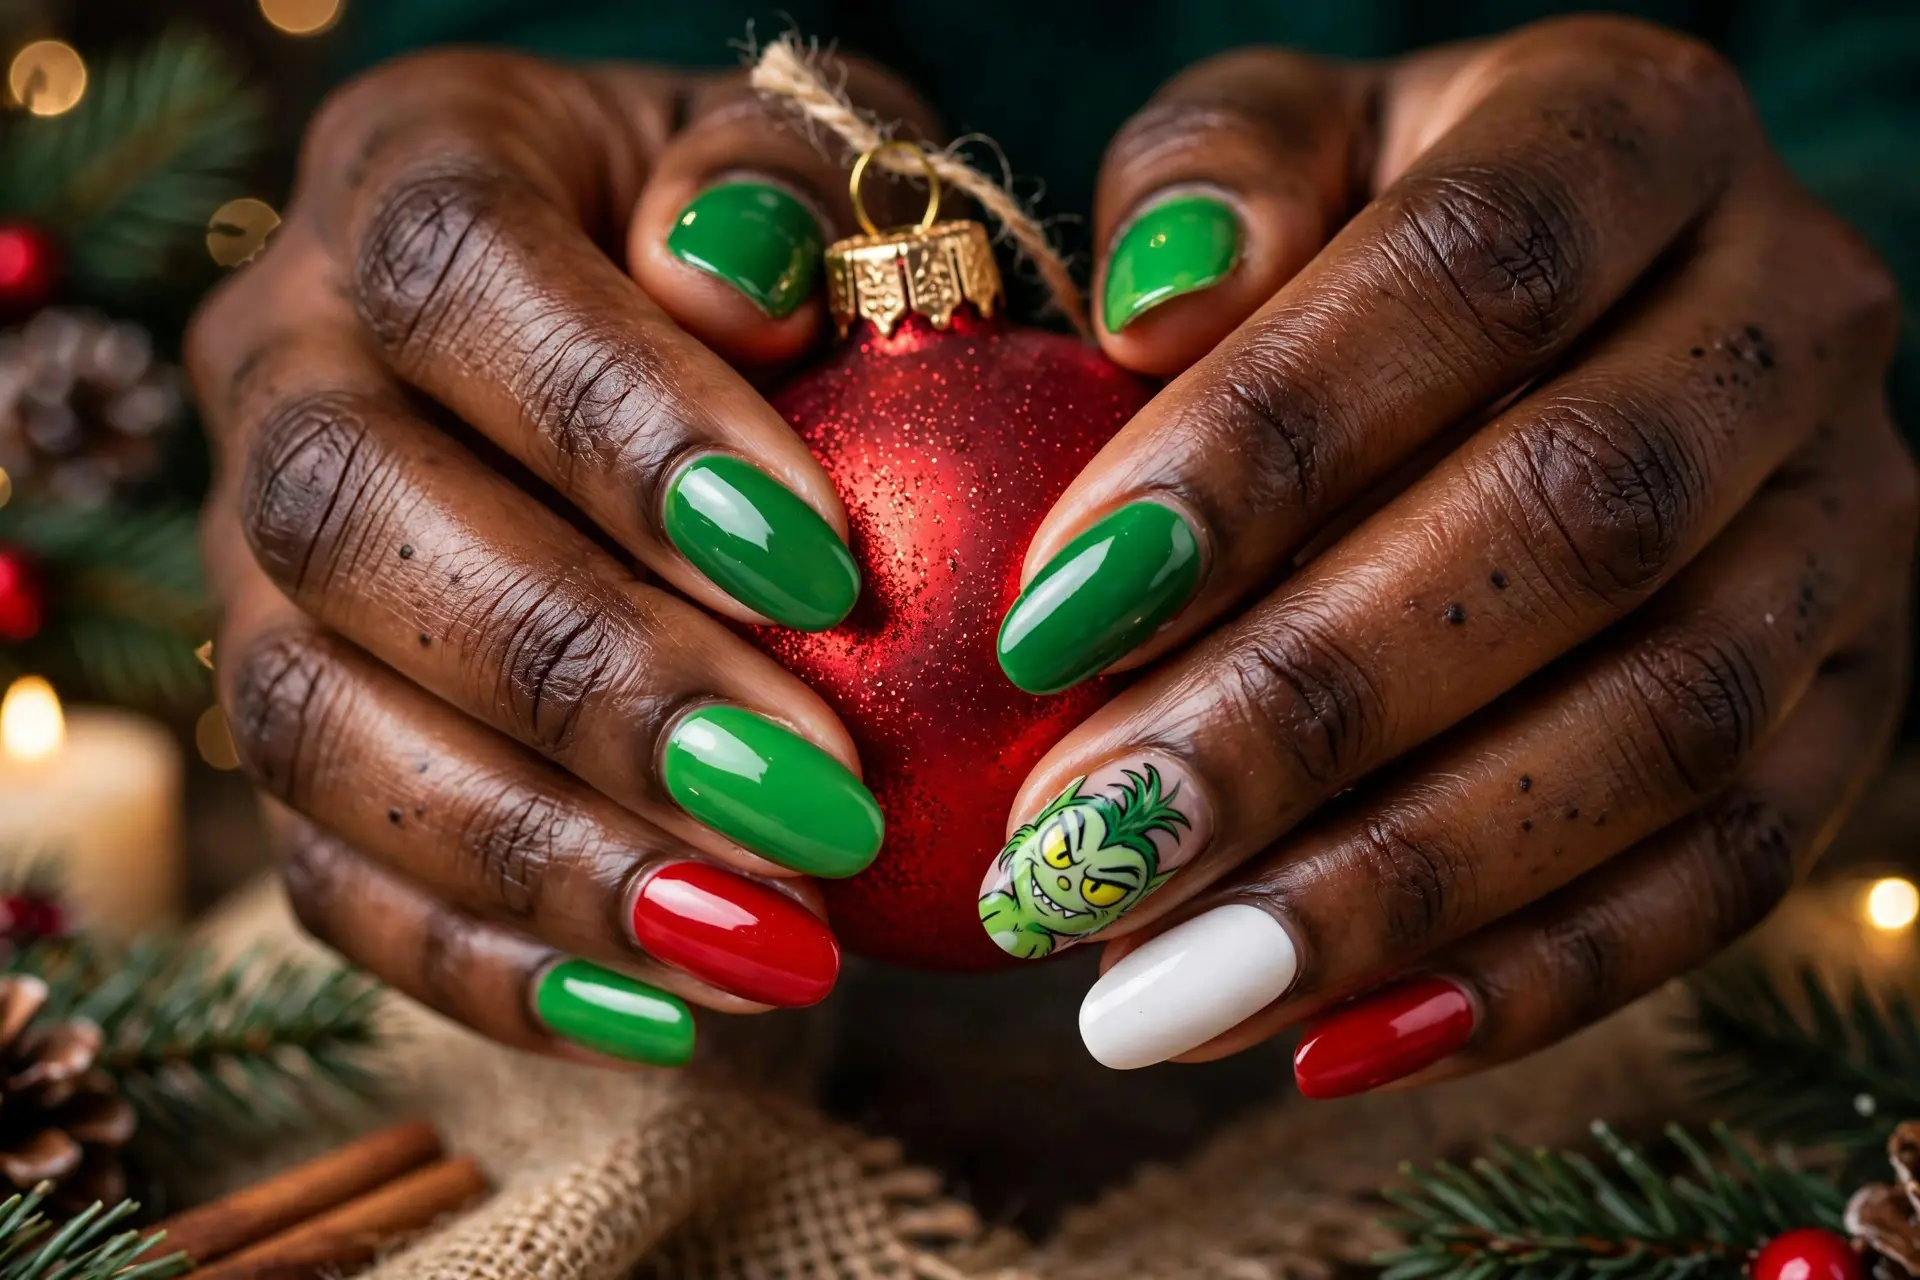
This is the showpiece of the collection: one nail given over entirely to the famous face — green fur, arched eyebrows, yellow eyes and that sideways grin that says the presents are not safe. Around it, keep the rest of the set simple in green, red and white solids so the portrait has room to shine.
Paint the face on your largest nail, usually the ring finger or thumb, starting with a pale base so the green reads bright. Block in the face shape first, then the tuft of hair, and save the eyes and grin for a fine liner brush once the base is fully dry.
Do not worry about perfection — a slightly wonky grin honestly suits him. If freehand feels daunting, paint the face on a clear press-on nail first, where mistakes can be wiped away and started again.
Tip: Seal character art with two thin layers of glossy top coat, floated on rather than dragged, so the brush does not smear the details.
4. Grinch and Max Christmas Nails

Every schemer needs his loyal sidekick, and this set celebrates the partnership. The nails stay in snowy Grinch green with white snowflakes, while two white accent nails tell Max’s part of the story: a sweet brown paw print finished with a tiny red bow, and a miniature wrapped present tied with gold ribbon.
The paw print is wonderfully beginner-friendly — one larger oval pad, four small dots for toes, and you are done — which makes this a clever way to get the two-character idea without painting two faces. The little gift box adds the Christmas-morning feeling he was always trying to steal.
Keep the snowflakes small and scattered so the accents stay the focus. This design reads beautifully at medium length, where there is space for both story nails on the same hand.
Tip: A dotting tool makes perfectly round paw toes; dip, dot the pad first, then place the four toes in a gentle arc above it.
5. Grinch Heart Nails
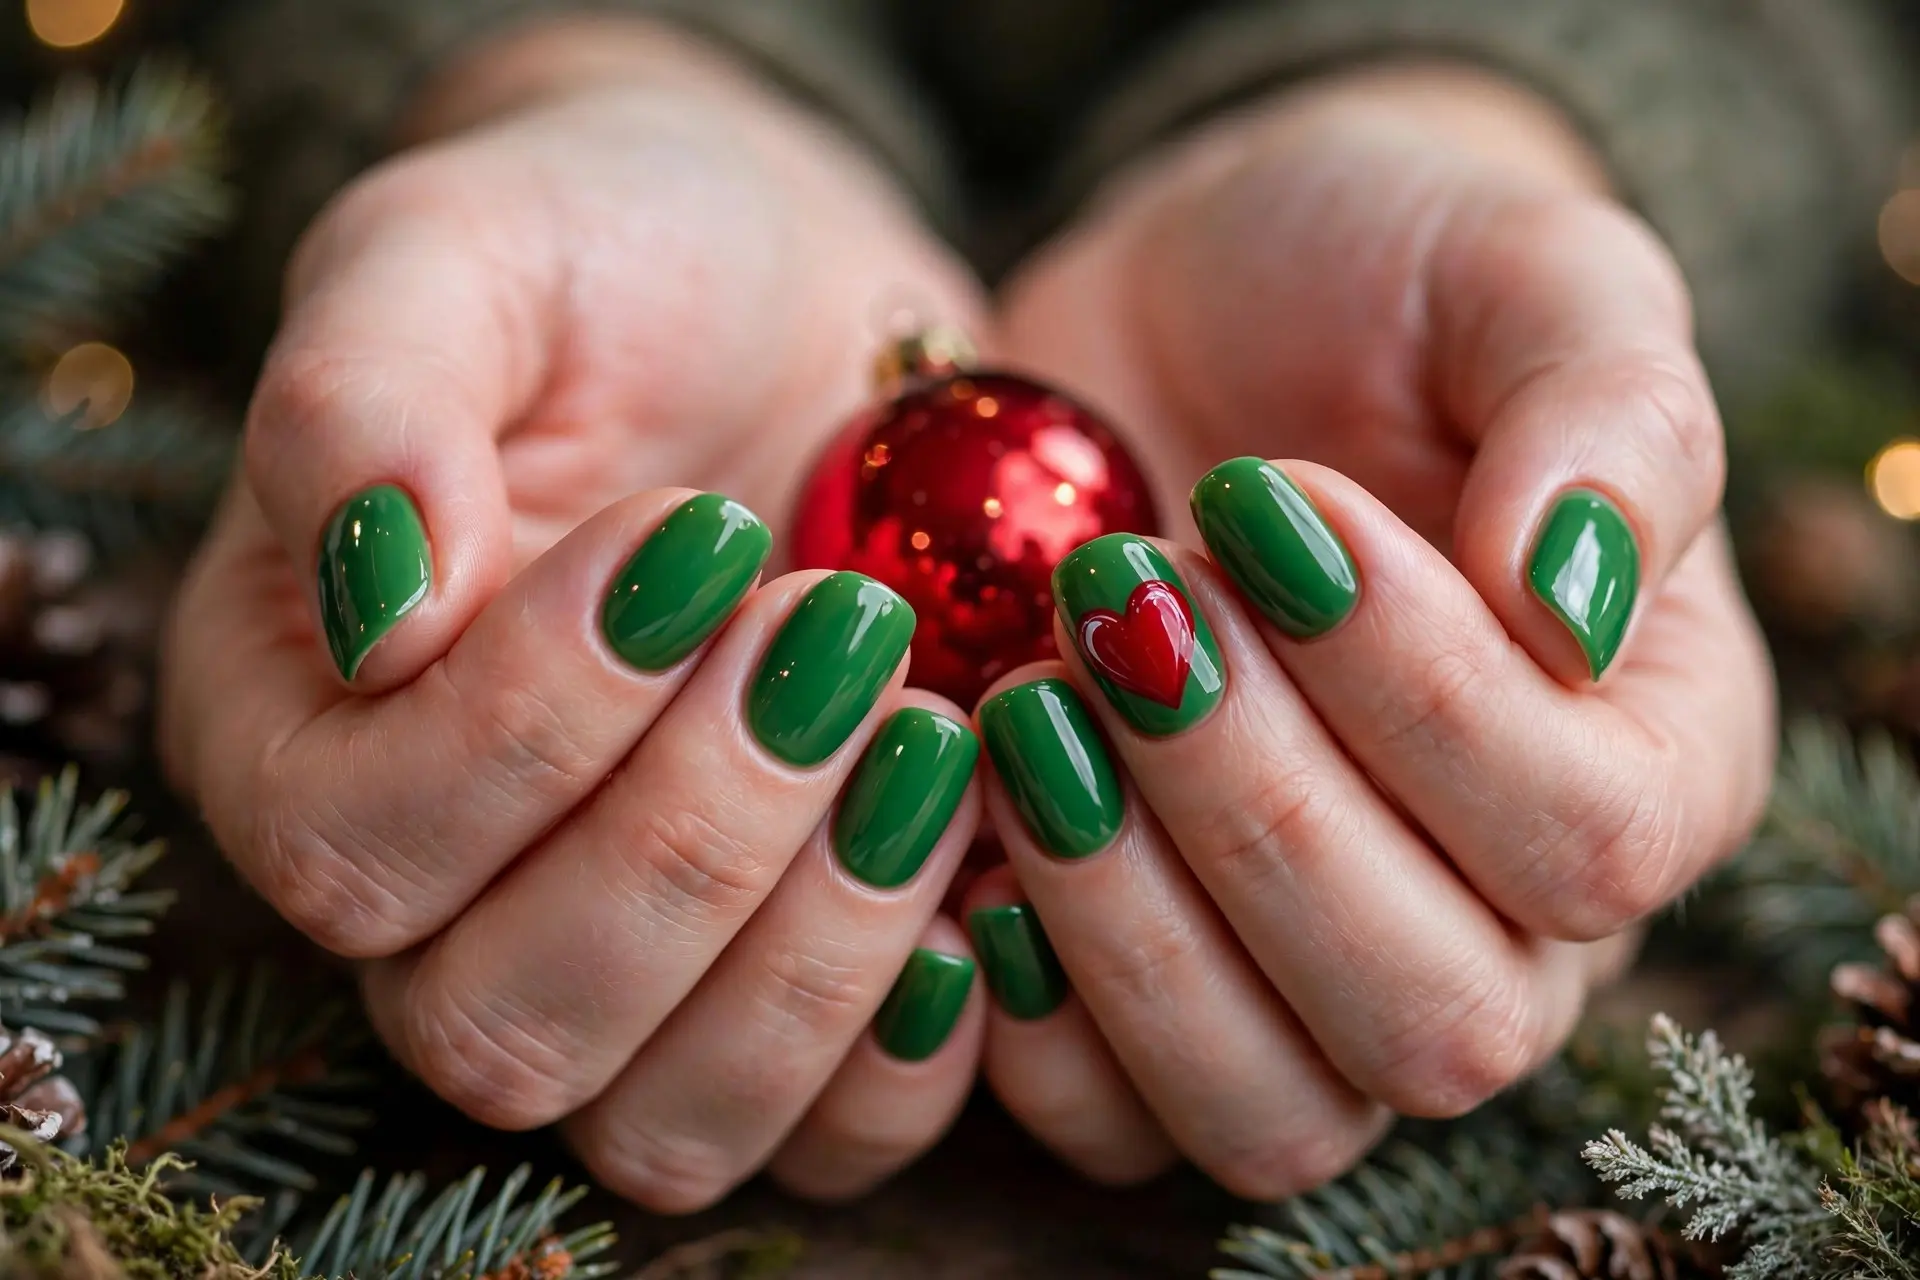
The moment his heart grew three sizes is the sweetest scene in the story, and this design paints it front and center. A deep, glossy green covers every nail, and one ring nail carries a single large red heart with a tiny white highlight that makes it look almost three-dimensional.
Sizing is the whole game here: the heart should nearly fill the nail, bold and simple, rather than shrinking into a corner. Draw it with two dots side by side and a triangle pulled down between them — the classic dotting-tool heart — then neaten the edges with a liner brush.
Because the palette is just two colors, this set looks polished enough for Christmas dinner yet takes minutes. It is also a lovely choice if the whole green-face idea feels like too much theme for you.
Tip: Paint the heart slightly higher on the nail than center; it balances better visually and leaves room for a clean outline.
6. Grinch Christmas Tree Nails
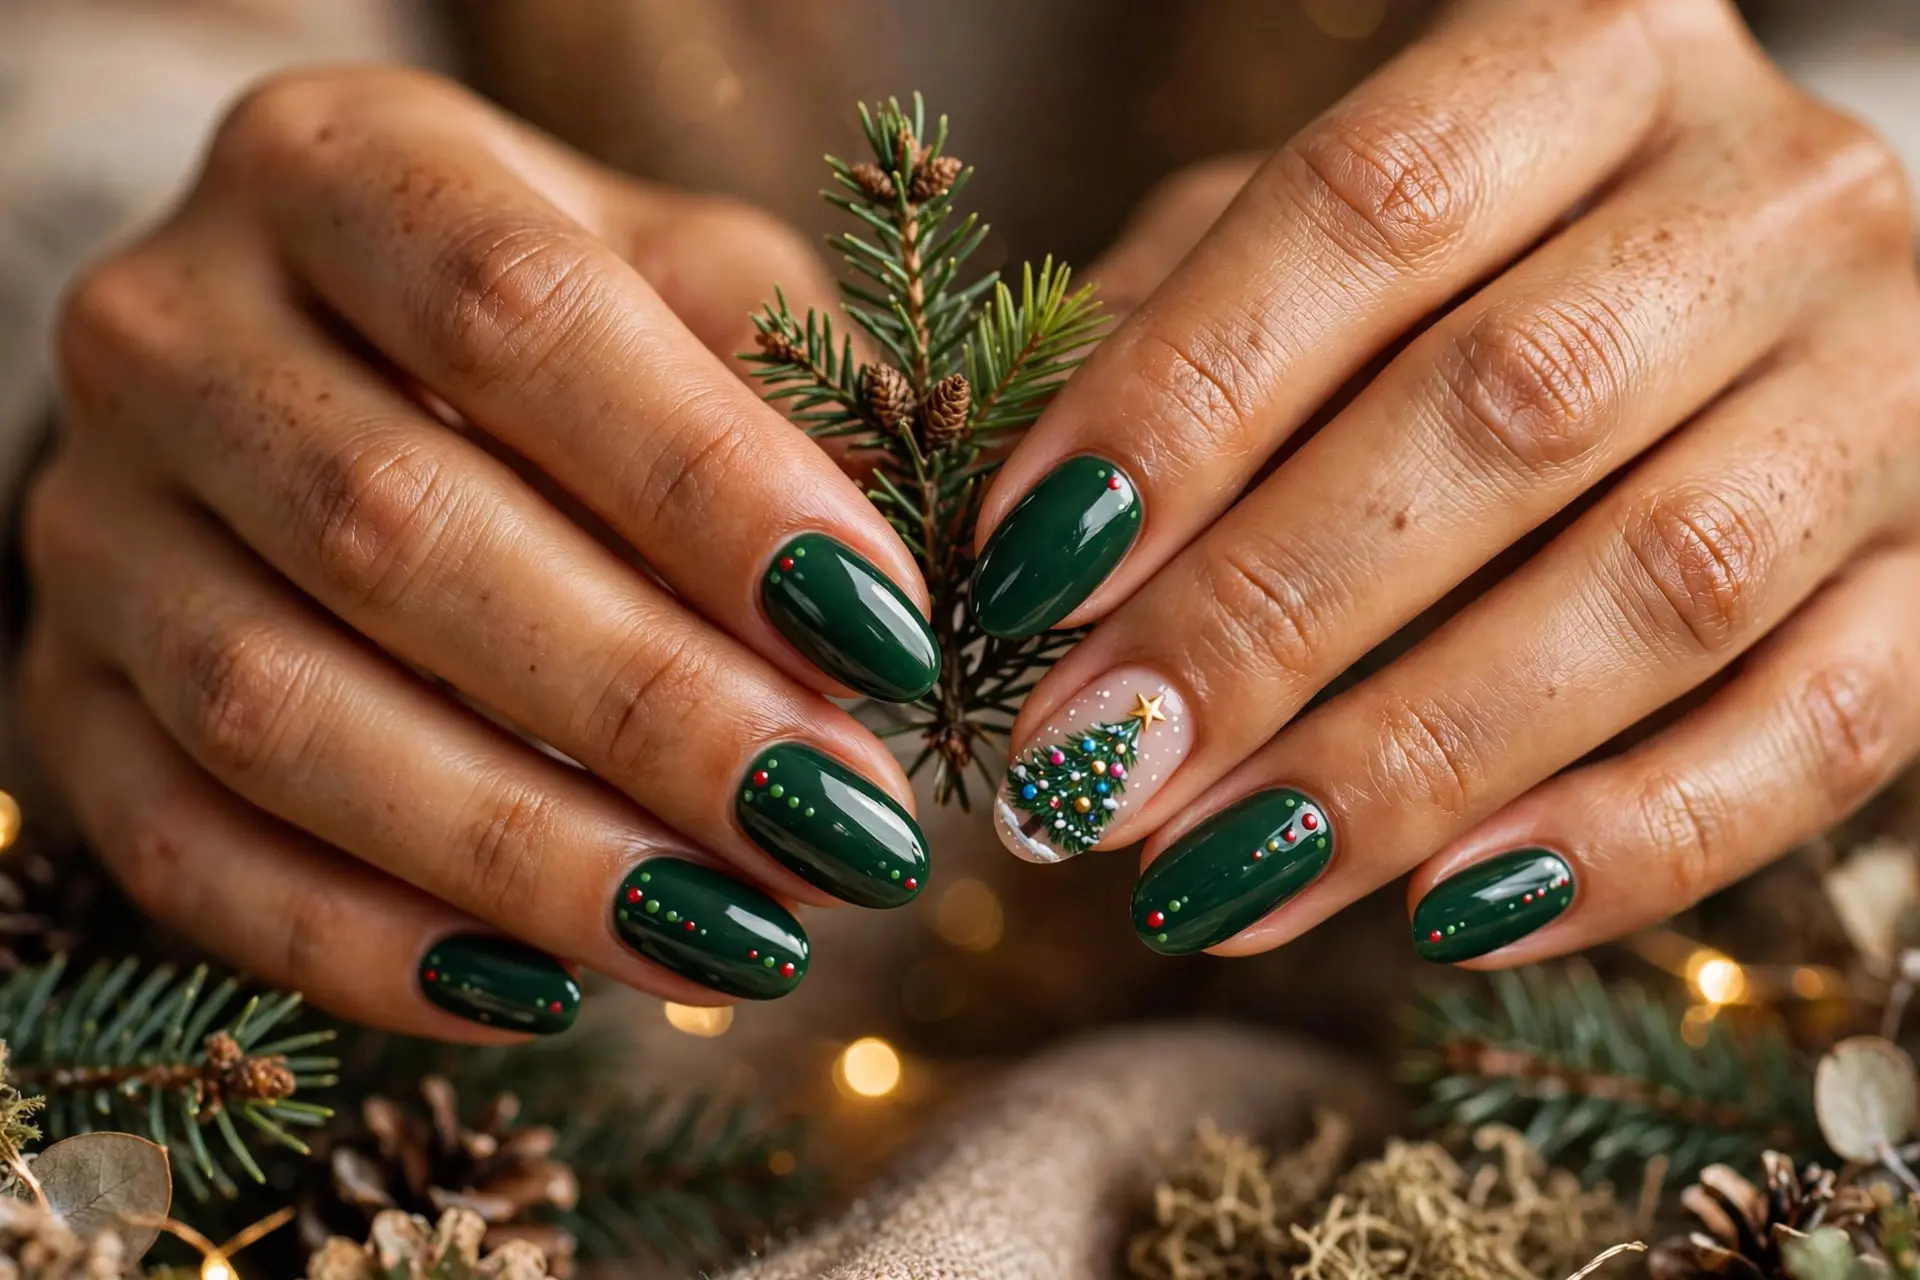
Here the green becomes the backdrop for the tree he famously tried to take home. Most nails stay deep green with tiny trailing dots in red, pink and gold — like strands of baubles — while one pale accent nail carries a fully decorated miniature tree, complete with colorful ornaments, falling snow and a gold star on top.
Building the tree is easier than it looks: a zigzag of dark green strokes, widest at the bottom, then dots for baubles once it dries. Putting the tree on the lightest nail gives the dark branches the contrast they need to read clearly.
The dotted trails on the other nails tie the whole set together, so nothing feels random. Wear it when you want maximum festive detail without any character painting at all.
Tip: Let each layer dry fully before adding the next; wet-on-wet dots bleed into blobs, especially the tiny gold star.
7. Grinch Candy Cane Nails
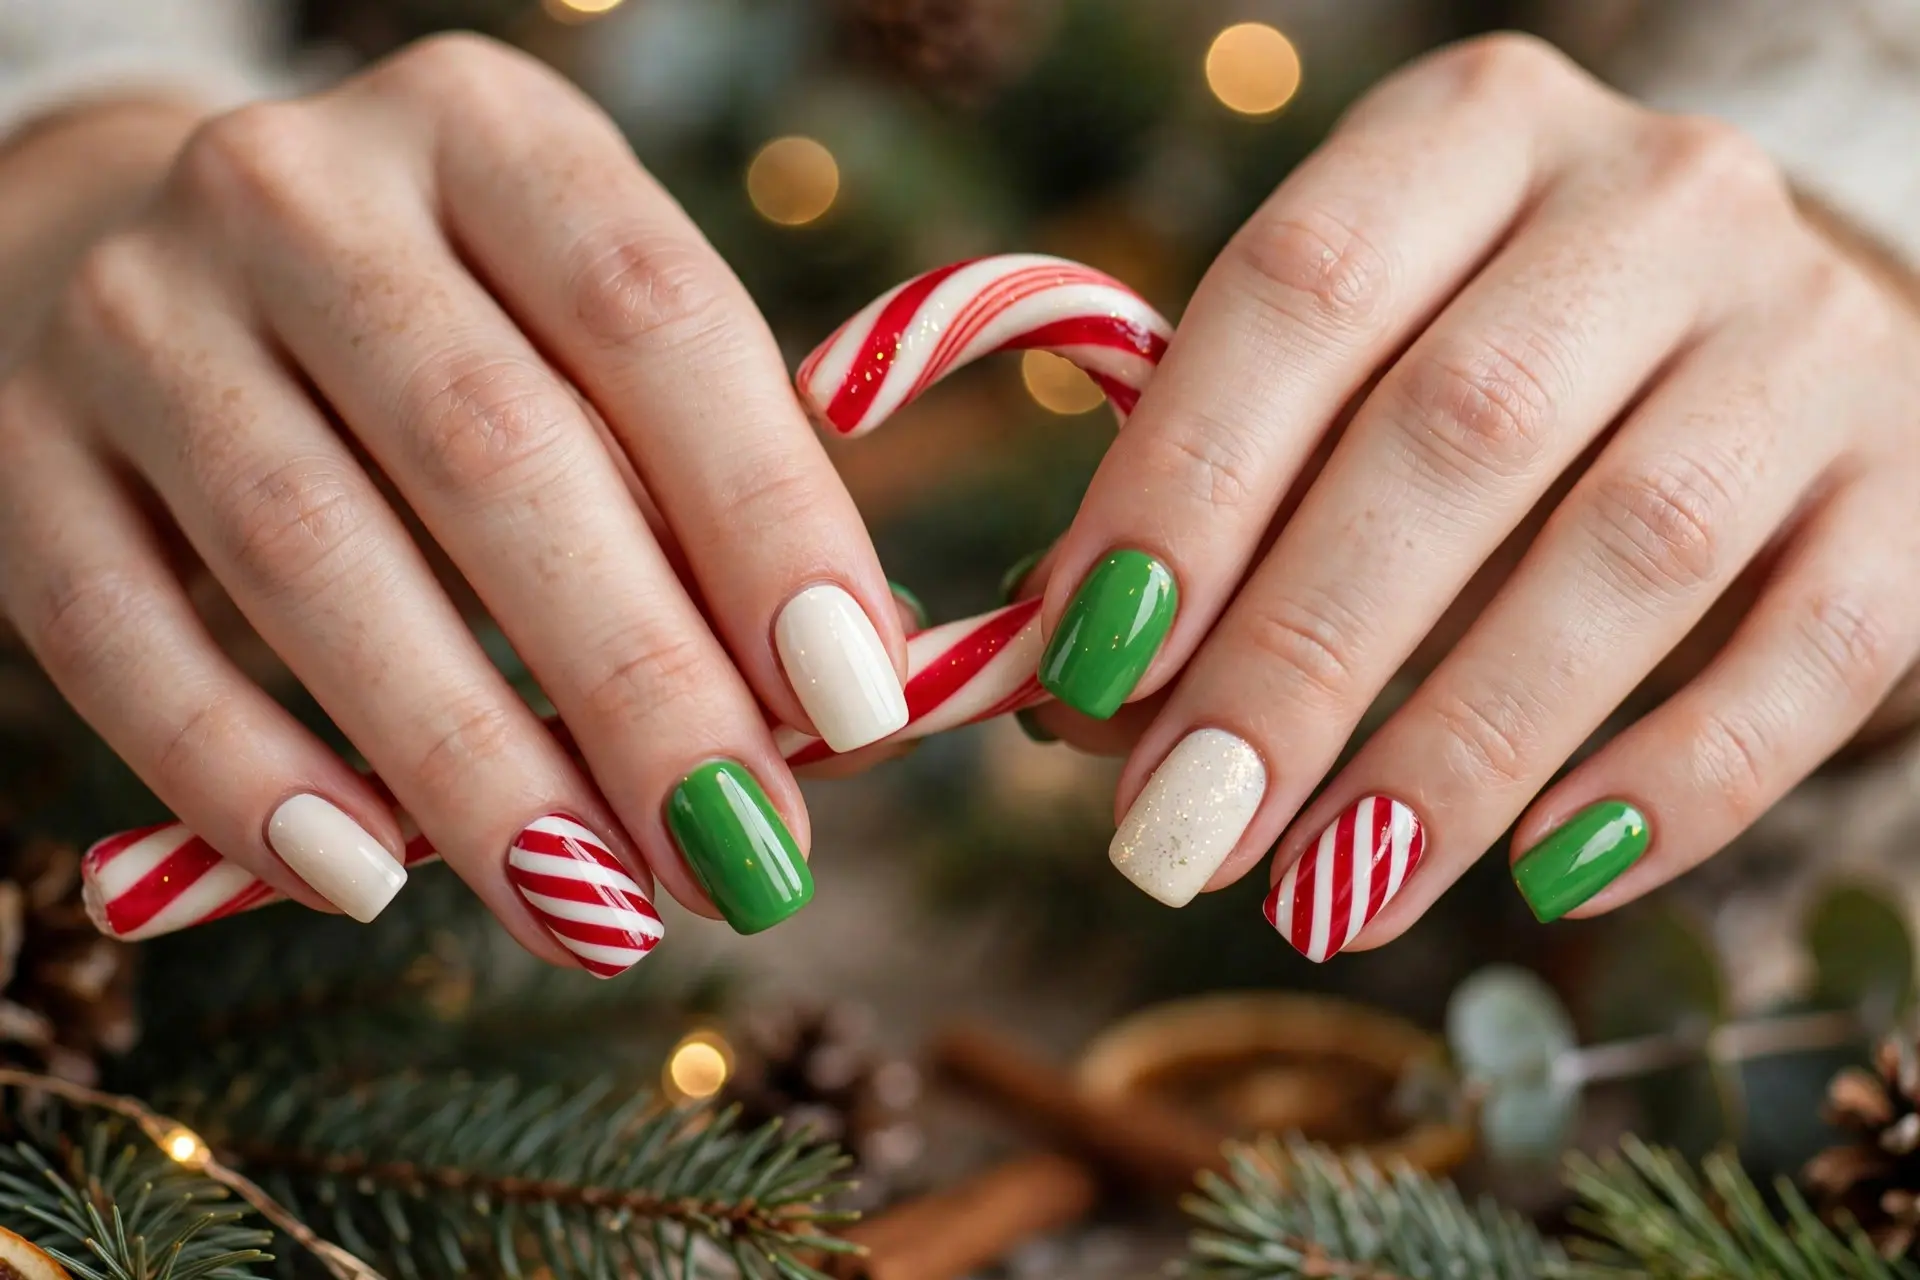
Two holiday icons share one manicure here. Bright green and creamy white nails alternate across the hands, two nails wear bold diagonal red-and-white candy cane stripes, and a single white glitter nail sneaks in a little sparkle for good measure.
The stripes are the skill element, and diagonal is the forgiving direction — they look intentional even when they are not perfectly even. Paint the white base first, let it dry completely, then pull thin red lines corner to corner with a striping brush in one confident stroke each.
This is the most playful everyday option in the list: from a distance it reads as a classic red, white and green Christmas set, and the candy stripes reveal themselves up close.
Tip: If your hand shakes, use striping tape over the dry white base, paint the red, and peel the tape away while the polish is still wet.
8. Glitter Grinch Nails

For anyone who believes Christmas nails should catch the light, this is the set. Every nail is coated in dense green glitter that sparkles gold and emerald as it moves, broken up by one glossy red nail carrying a single white snowflake — the calm moment that makes the glitter look even brighter.
Build glitter in thin layers rather than one thick coat; two or three sponged-on layers give full, even coverage without the gloopiness that chips by day two. A peel-off base coat underneath will save you a long, glittery removal session in January.
The contrast nail matters more than it seems — an all-glitter set can blur into one sparkly mass in photos, while the smooth red nail gives the eye somewhere to land.
Tip: Finish glitter with a glitter-smoothing top coat, then a glossy one; glitter eats top coat and can feel rough without the extra layer.
9. Grinch Ombre Nails
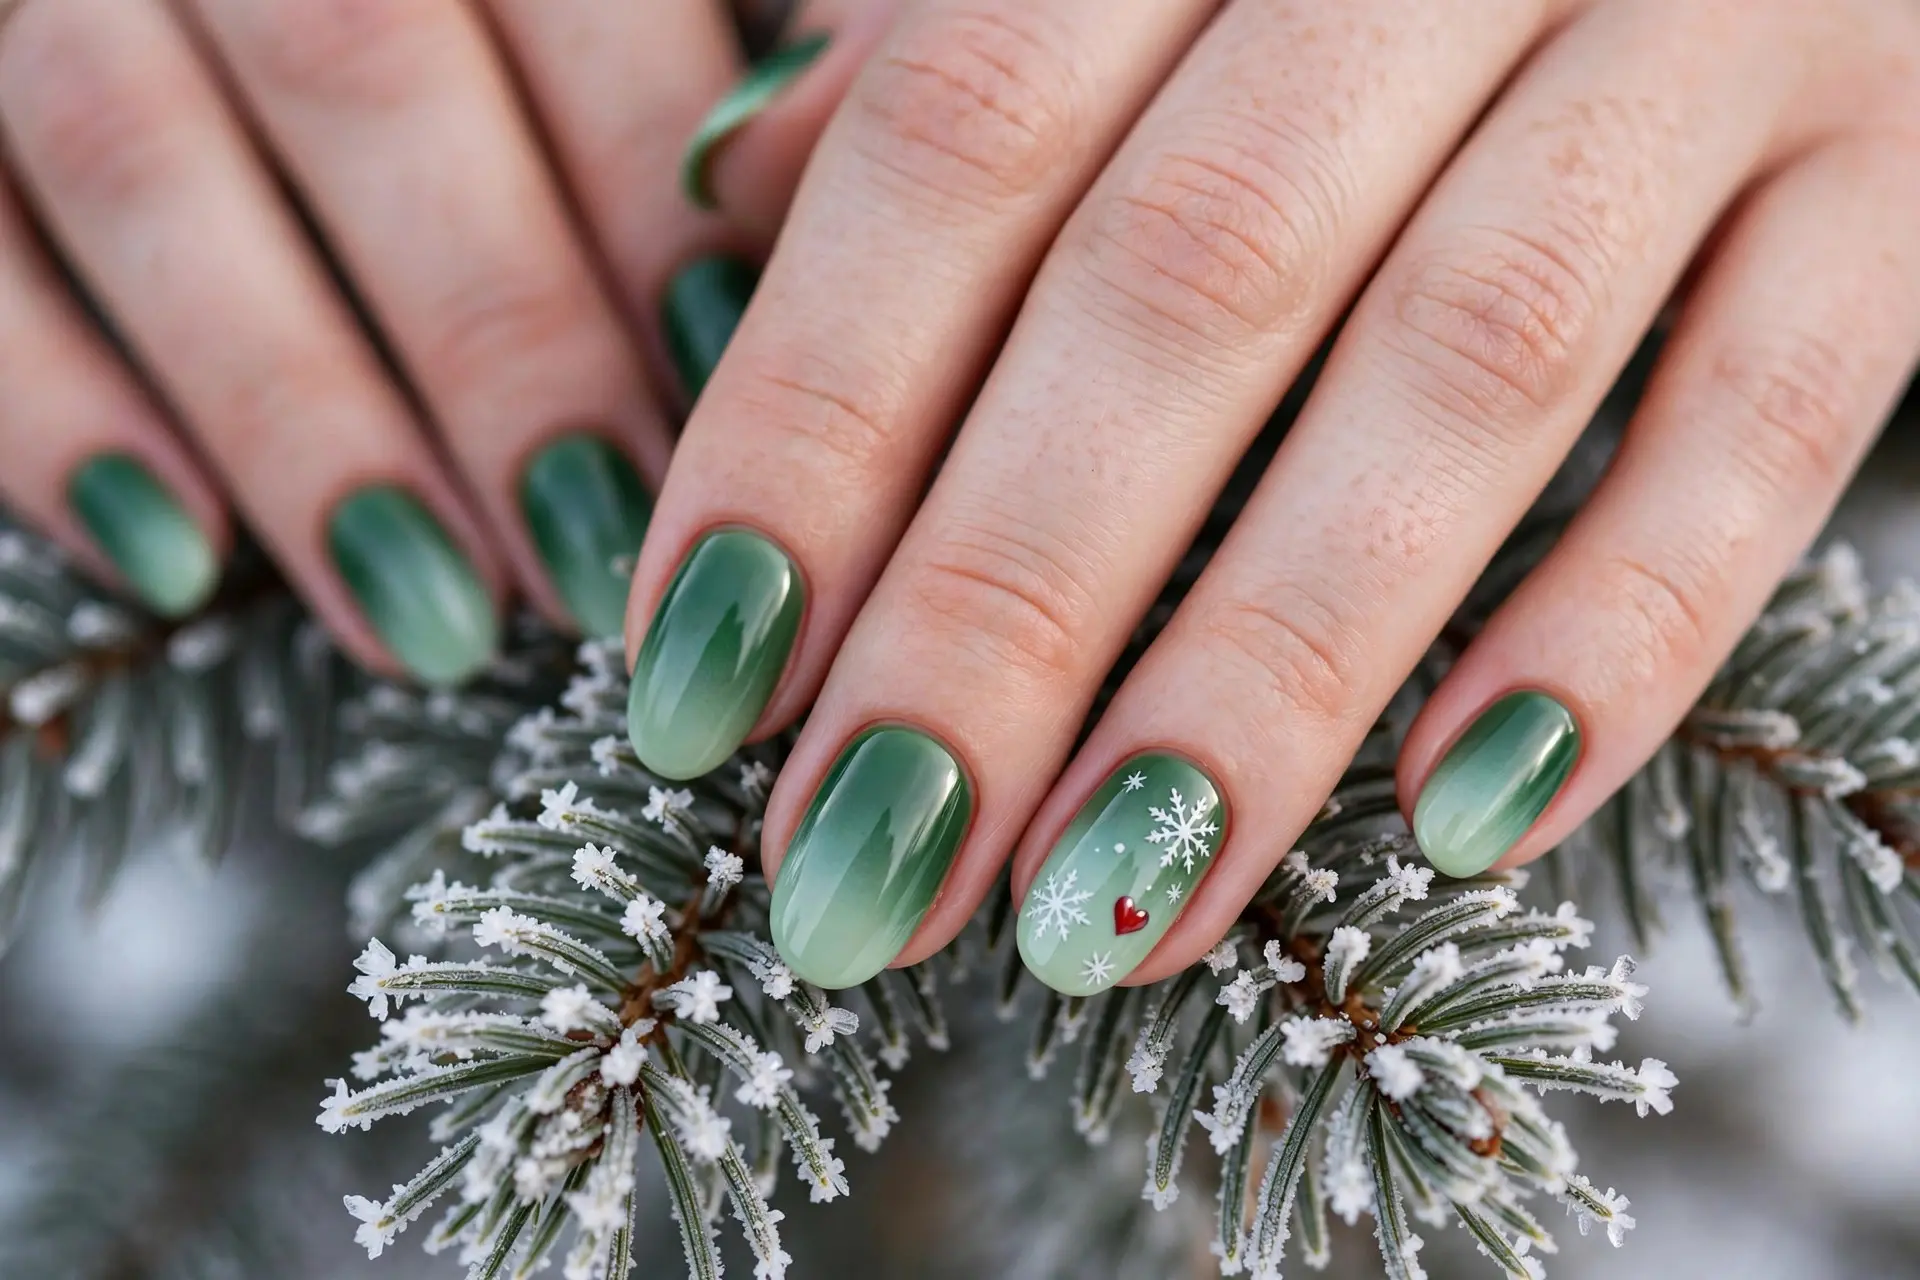
The softest take in the collection fades deep forest green at the base down to an icy mint at the tips, like frost creeping over the hills above town. One nail adds delicate white snowflakes and a single tiny red heart — the one small warm note in a cool, wintry design.
The gradient comes from a makeup sponge: paint stripes of both greens side by side, dab over the nail, and repeat twice for a seamless blend. Slightly overlapping the colors on the sponge is what prevents a harsh line in the middle.
Ombre is forgiving of grow-out and looks elegant at medium to longer lengths, where the fade has room to breathe. It suits anyone who wants the theme whispered rather than announced.
Tip: Protect the skin around your nails with liquid latex or petroleum jelly before sponging — gradient cleanup is otherwise the longest part of the job.
10. Pink and Grinch Nails
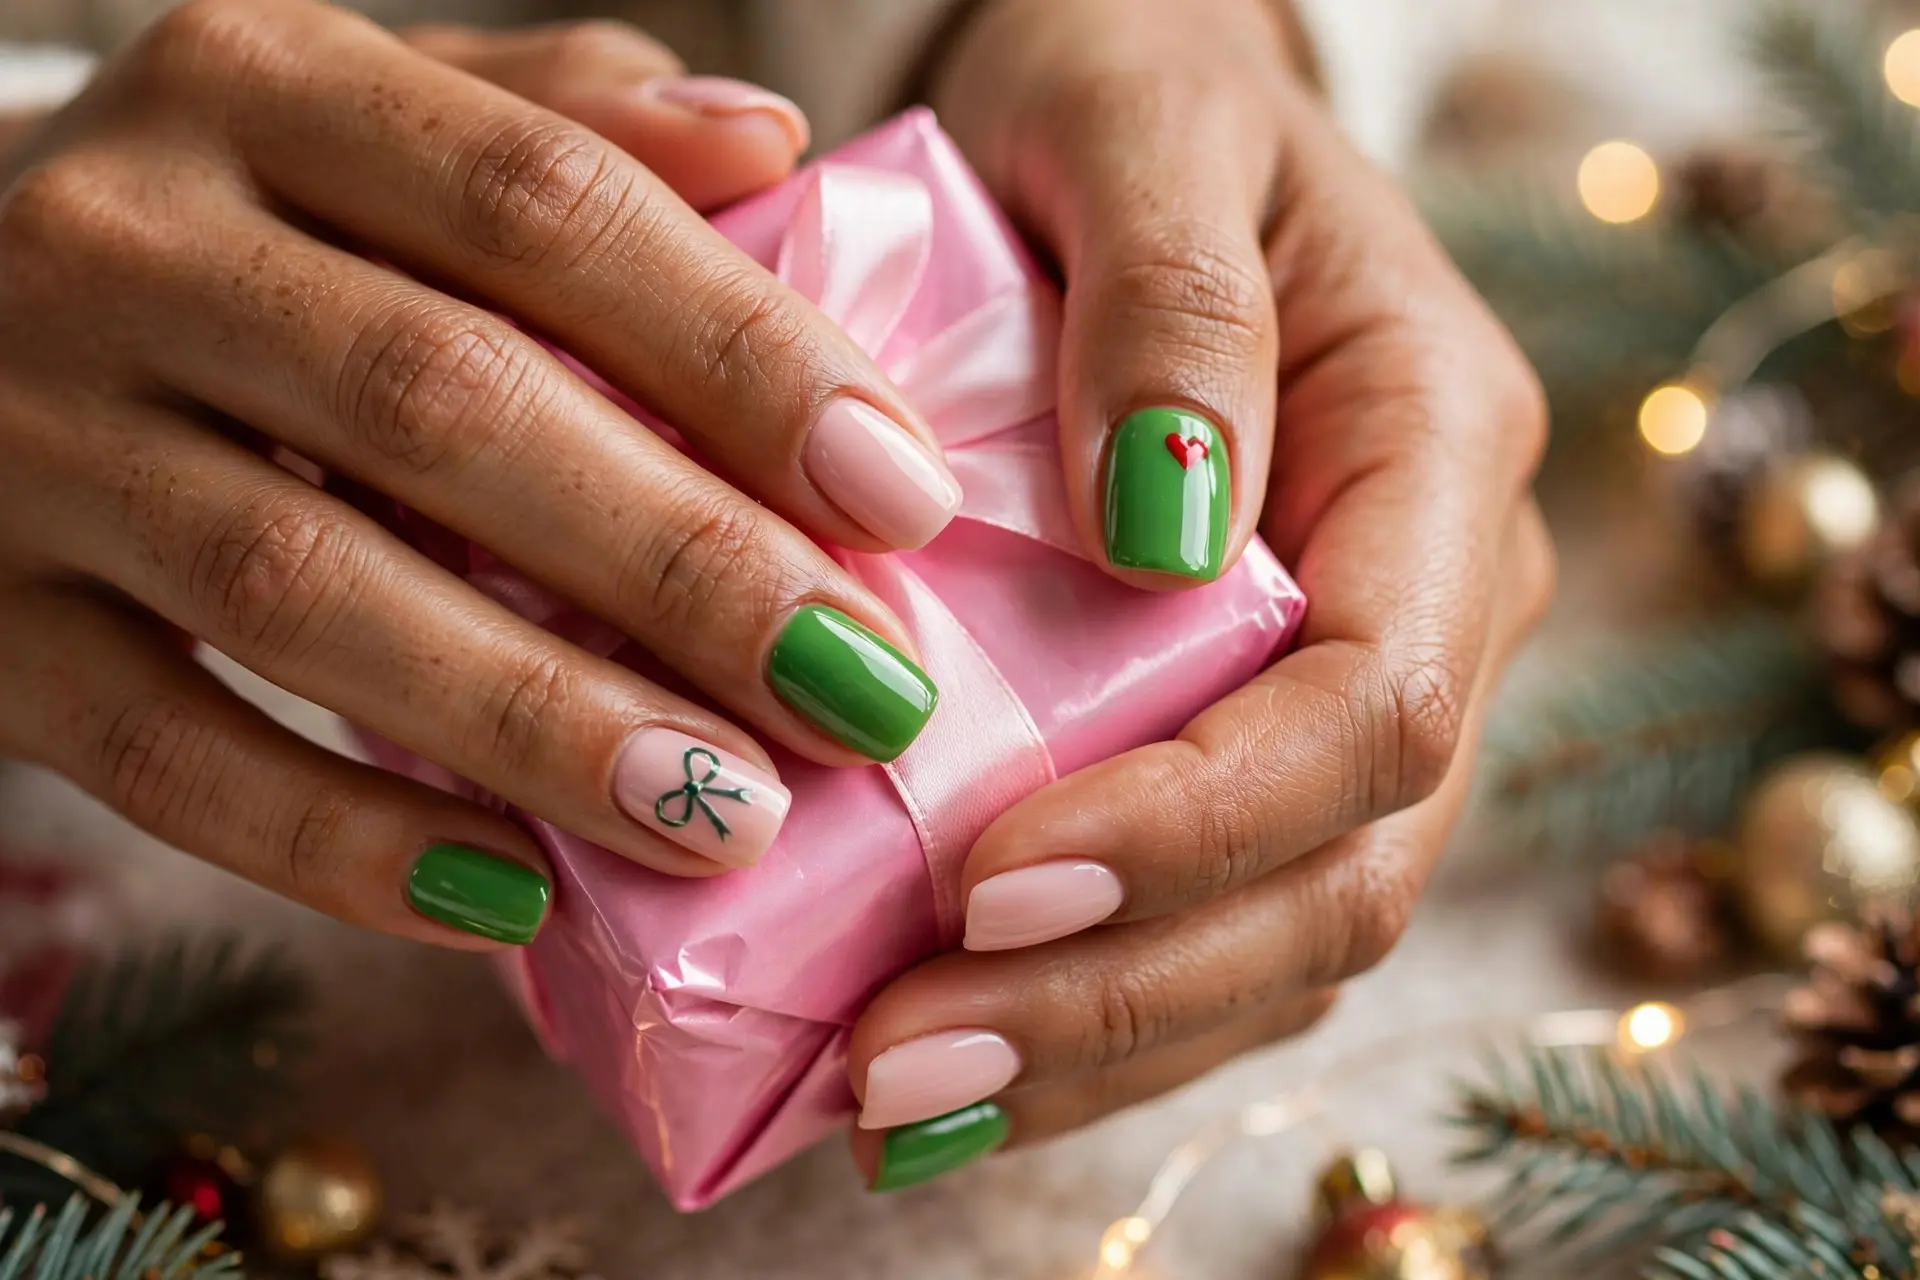
If classic Christmas colors are not your palette, blush pink changes everything. Soft pink and bright green alternate across the nails, a tiny red heart sits on one green nail, and a neat little green bow is painted on a pink one — festive, but with a distinctly sweet, modern feel.
The trick is choosing the right pink: a soft blush with a hint of warmth sits happily beside the bold green, while icy blue-pinks can fight it. Test the two bottles side by side on a piece of paper before committing to a full set.
This design flatters medium squoval nails and photographs beautifully against pink or cream knitwear. It is the one to pick when your December wardrobe leans pastel rather than traditional.
Tip: Keep the bow tiny and centered on one nail only; repeating it everywhere tips the set from chic into costume.
11. Grinch Sweater Nails

This set wraps your nails in the coziest Christmas sweater imaginable. Matte green, red and cream nails mix cable-knit textures, fair-isle zigzag bands, tiny scattered hearts and snowflakes — every nail different, all of them looking like they were knitted rather than painted.
The matte finish is what sells the illusion; gloss would turn the same patterns back into ordinary nail art. The raised cable effect comes from painting the pattern in a slightly thicker gel or acrylic paint and leaving it un-top-coated so the texture stays softly three-dimensional.
It is the most time-intensive design here, so simplify if you are painting at home: fair-isle zigzags and hearts on most nails, with one cable-knit accent, gives the same cozy story with half the work.
Tip: Work one nail at a time and cure or set each pattern before moving on — sweater details are small, and smudging one zigzag means starting that nail over.
12. Grinch Stole Christmas Nails
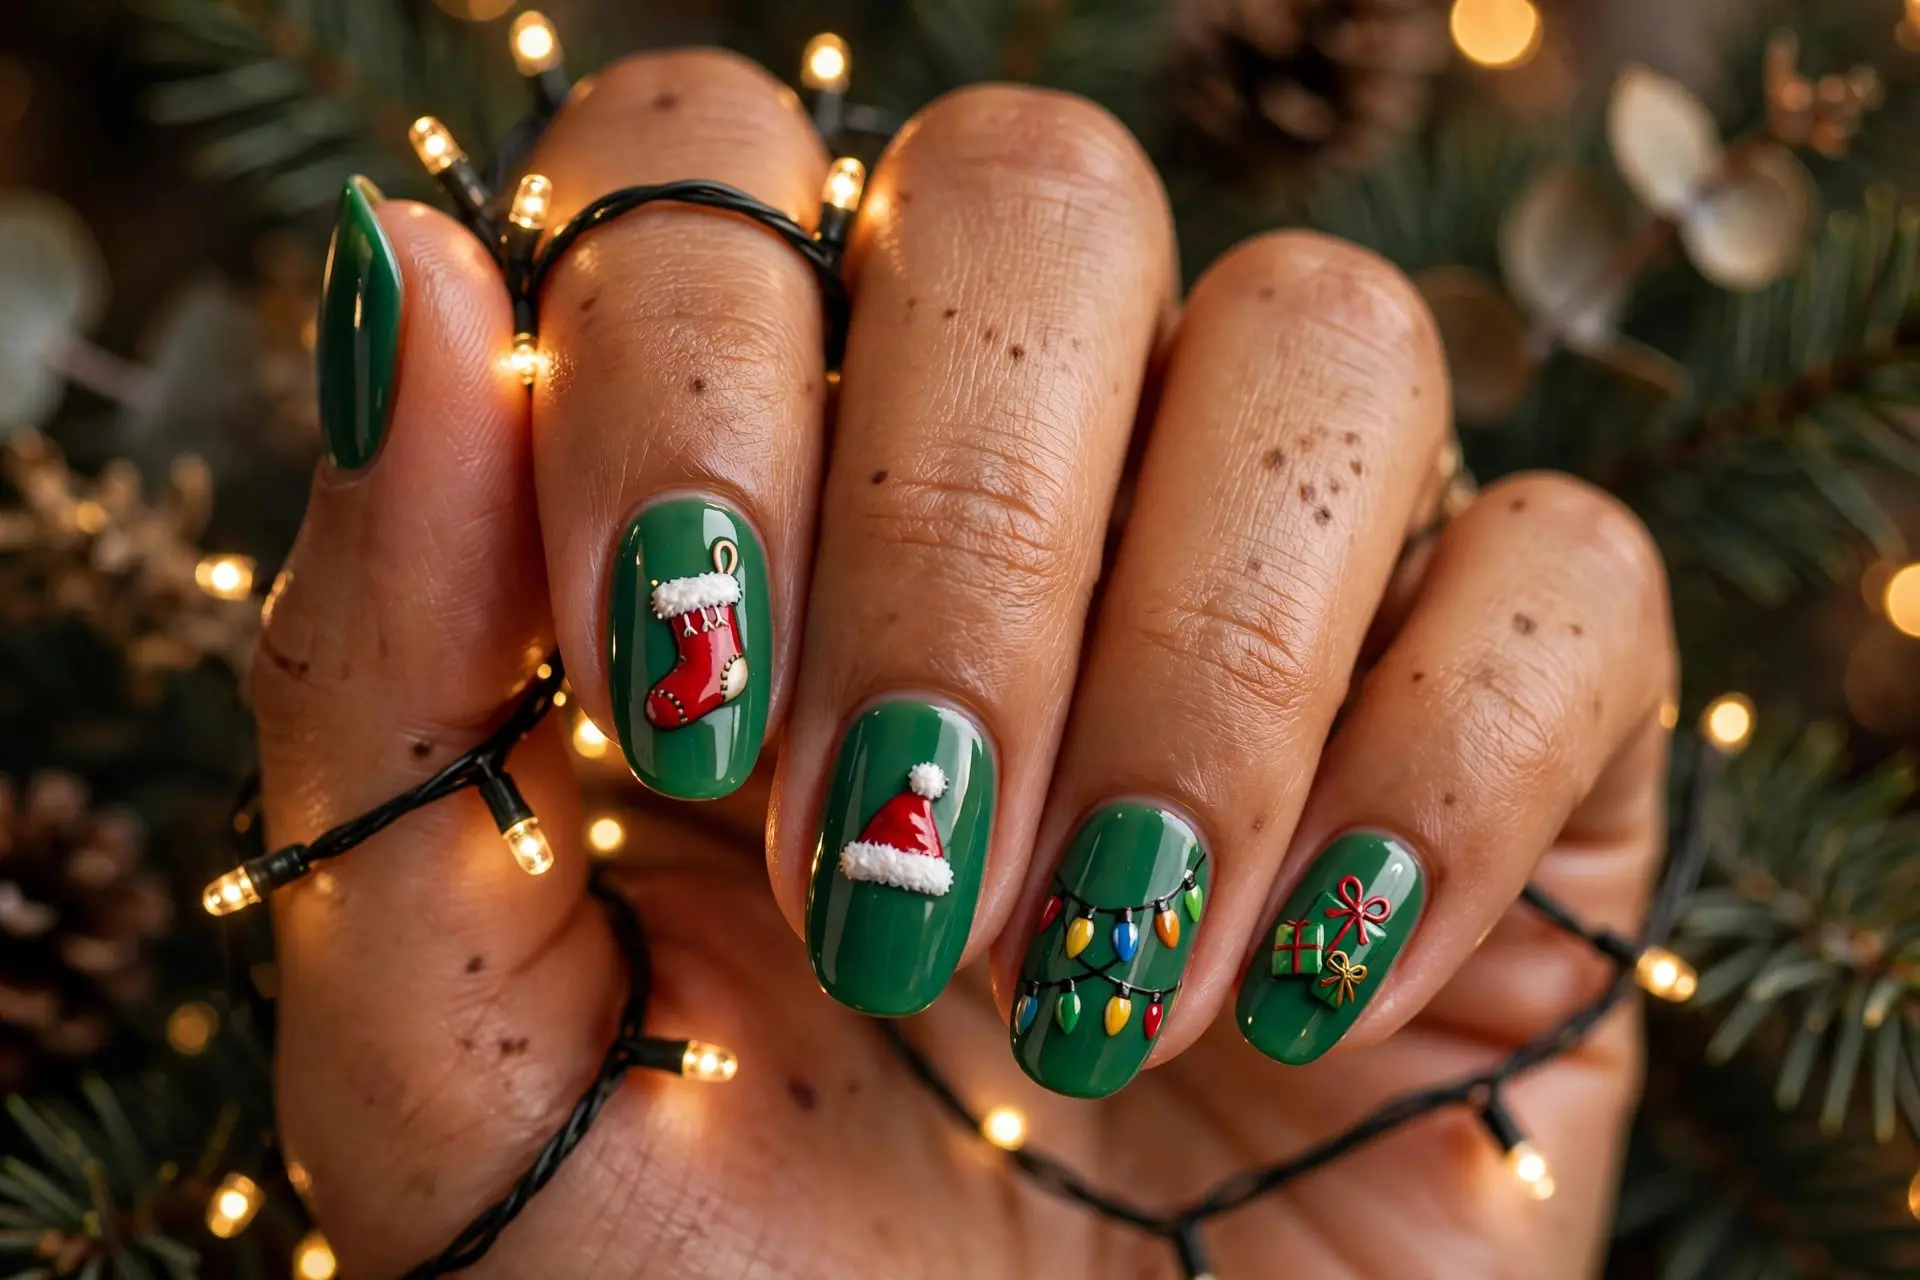
This manicure turns one hand into the whole story. Across a deep green base, each nail carries a different treasure from the great Christmas heist: a red stocking with a fluffy white cuff, a tiny Santa hat, a string of glowing multicolored lights, and a pair of small wrapped presents with bows.
Giving every nail its own single motif is the design’s smartest move — each little painting stays simple and readable, while together they add up to a scene. Keep the background one consistent dark green so the hand reads as a set, not five separate ideas.
This is the maximum-personality option, made for Christmas parties, school runs in December and anyone who gets asked about their nails in the grocery line. Expect exactly that to happen.
Tip: Sketch the order of your motifs across both hands before you start, so the two thumbs do not end up carrying the same design.
13. Cute Grinch Short Nails

Short nails absolutely get to join in — in fact, the theme’s simpler motifs suit them best. This set keeps every nail in glossy bright green at a neat natural length, with one clean white snowflake as the only artwork, and it looks fresh, tidy and completely deliberate.
On a small nail bed, one motif per nail is the ceiling; anything more turns to mush at conversational distance. Tiny hearts, single snowflakes and mini candy stripes are the short-nail sweet spot, and full-color polish does most of the festive work for you.
There are practical wins too: short themed nails survive gift-wrapping, baking and keyboard work without a single casualty, and a chipped nail can be repainted in two minutes flat.
Tip: Round short nails into a soft oval — it makes the nail bed look longer and gives a snowflake or heart a touch more room.
14. Red and Green Grinch Nails

Sometimes the classic pairing is classic for a reason. Glossy red and Grinch green alternate nail by nail, the green nails carry crisp white snowflakes, and one small nail adds a red-and-white candy stripe — traditional Christmas, with the proportions tipped just enough toward green to keep the theme.
Alternating solid colors is the fastest full set you can paint, which makes this a brilliant last-minute option that still looks planned. The snowflakes take a minute each with a fine brush or a stamper and lift the whole thing beyond a plain two-color manicure.
Match the red carefully: a true, slightly warm Christmas red sits best beside bright green, while burgundy shifts the mood moodier and more grown-up — also lovely, just a different party.
Tip: Paint the green nails first; green pigment is strong, and any small cleanups are easier before the red goes on.
15. Grinch Christmas Party Nails
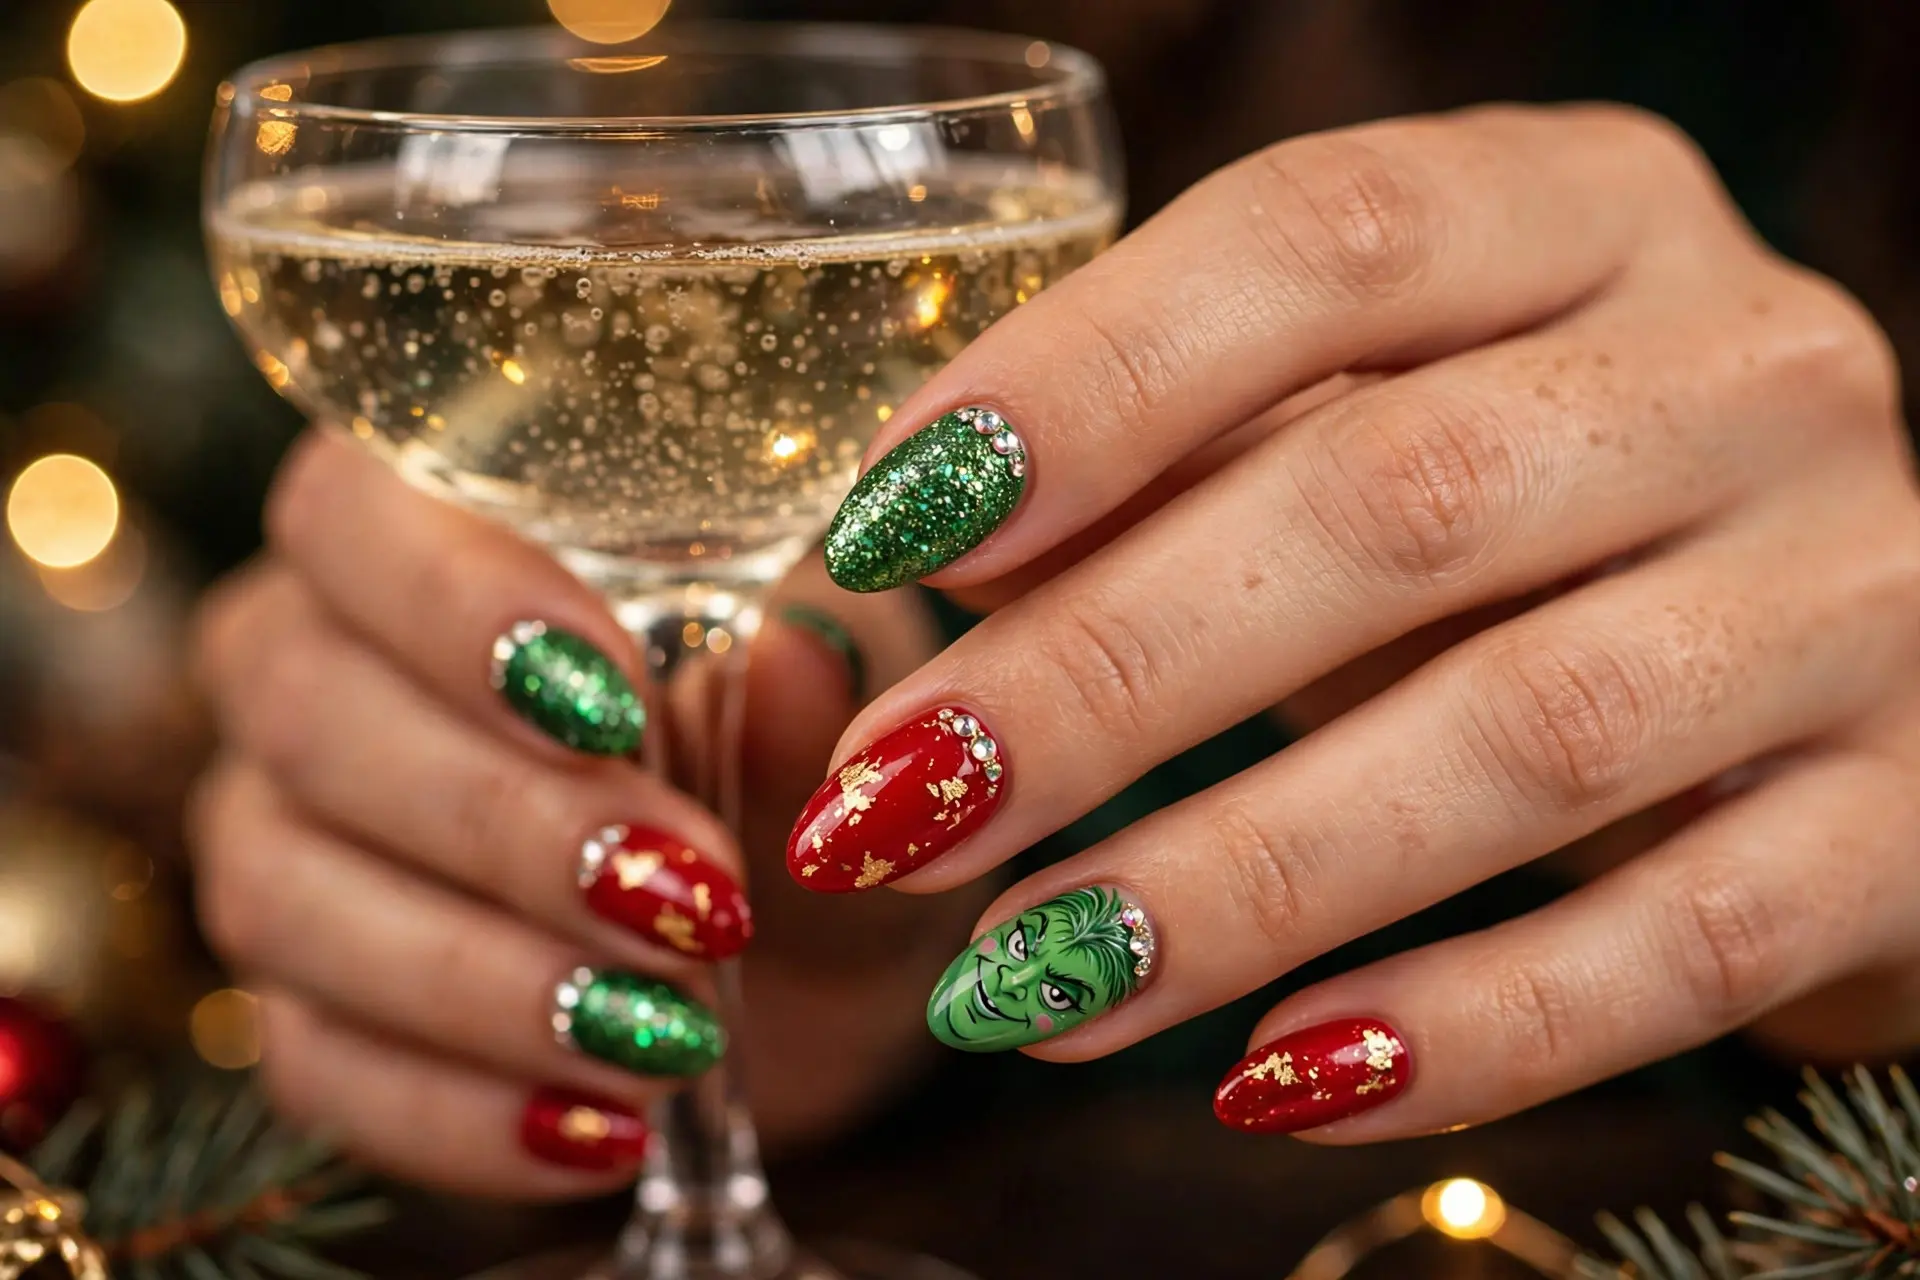
For the big night, everything arrives at once — tastefully. Green glitter nails, glossy red nails scattered with gold foil, tiny rhinestones clustered at the cuticles, and one full Grinch face grinning from the ring finger: it is the whole theme dressed in its party best.
The secret to mixing this much without chaos is a strict palette. Green, red, gold and sparkle, nothing else — every texture is different, but the colors repeat, so the set reads as glamorous rather than busy. Plan which nail gets which finish before the first bottle opens.
Save this one for when the nails will be photographed: holding a glass, opening presents, wrapped around a mug. The face and the foil both love a camera flash.
Tip: Apply rhinestones into wet top coat with a wax pencil, then seal around — not over — the stones, so they keep their sparkle and stay put all night.
Styling Tips
Let one hand tell the story. Character art on every nail can overwhelm; a face or scene on one hand — or even one nail — against coordinated solids looks deliberate and designed. If you paint the face on your dominant hand’s ring finger, it appears in every photo you take holding a drink or gift.
Match your green to your skin’s undertone. The signature shade is a yellow-leaning lime green, which glows on warm and olive skin. If your skin is cool-toned, a slightly deeper, bluer green keeps the theme while flattering you more — the mischief reads either way.
Plan the set around your December calendar. French tips and the red-and-green alternation survive two weeks of office life; full scenes and rhinestones are weekend-and-party pieces. Many readers paint a wearable base early in the month, then add the statement accent nails the week of their biggest event.
Coordinate, do not compete. These nails are the loudest accessory you own this month, so let them lead: simpler rings, plain knitwear in cream, red or black, and let the green do the talking. Save patterned Christmas sweaters for the sweater-nail design, which was quite literally made for them.
Common Mistakes to Avoid
Crowding every nail with art. Ten tiny paintings blur into noise. The strongest sets in this list give artwork to one, two or three nails and let rich solid color do the rest — negative space is what makes a painted face look impressive.
Skipping base coat under green. Bright green and lime pigments stain natural nails yellow-green, and the ghost can linger for weeks. A quality base coat is non-negotiable here, and so is a quick test nail if you are trying a highly pigmented new polish.
Painting details onto wet polish. Faces, stripes and snowflakes all smear when the base is tacky. Either let each layer dry fully or flash-cure gel between steps; ten patient minutes beat restarting a ruined accent nail.
Sealing art with a heavy hand. Dragging a loaded top-coat brush across fresh nail art pulls the colors with it. Float a bead of top coat over the design instead, and use a matte top coat only where the design calls for it — it dulls glitter and metallics instantly.
The Best Shapes and Finishes for Grinch Nails
Shape decides how much story a nail can hold. Almond and oval nails offer the longest, widest canvas, which is why the face, tree and storybook designs all sit on them here; a medium almond is the single most versatile choice for this theme. Square and squoval nails flatter the graphic designs — candy stripes, French tips and color blocking — because their straight edges echo the geometry. Short, rounded nails are not excluded; they simply ask for smaller, simpler motifs, one per nail, with the color doing the heavy lifting.
Finish is the second half of the design. High gloss is the default for good reason: it makes the signature green look rich and juicy, deepens reds, and protects detailed painting. Matte is a deliberate choice rather than a shortcut — it turns sweater patterns convincingly woolly and gives ombre a frosted, wintry feel, but it flattens glitter and can make bright green look chalky, so reserve it for those two jobs. A hybrid set, glossy solids with one matte accent, often looks the most designed of all.
Finally, think in accents. Detailed faces belong on the largest nail you have — usually the ring finger, with the thumb as a close second — and they read best when the neighboring nails are quiet solids in the theme’s colors. Simpler motifs (hearts, snowflakes, paw prints, stripes) can repeat across two or three nails without crowding. Decide your accent map before you open a bottle: which nail gets the star, which get supporting details, and which stay plain. That one minute of planning is the difference between a themed manicure and a professional-looking one.
Frequently Asked Questions
What colors are best for Grinch nails?
The essential palette is the signature bright green, Christmas red, white and a little black for outlines and details. Gold, silver and glitter add glamour for parties, while blush pink offers a softer modern twist. If you only buy one new bottle, make it the green — every design in this list starts there, and the rest can come from colors most people already own.
Can I do Grinch nails on short nails?
Yes, happily. Short nails wear full green polish, tiny hearts, single snowflakes and mini candy stripes beautifully — idea 13 is designed exactly for them. The rules are simply smaller motifs, one per nail, and a rounded oval shape to maximize the canvas. Save full face portraits for a thumb or a press-on accent if your nail beds are very small.
What are the easiest Grinch nail designs?
The classic all-green set, the green French tips and the alternating red-and-green design are the three easiest — they need no drawing at all beyond, at most, a dotting-tool heart. Candy cane stripes look advanced but are forgiving done diagonally with tape. Paint your first face on a press-on nail or a practice wheel, where there is zero pressure to get it right first time.
Are Grinch nails good for Christmas parties?
They are made for them — few manicures start more conversations. For parties, lean into the glitter set, the storybook scene or the full party mix with the painted face and gold foil. If the party is a work event, the face on a single accent nail with polished solids elsewhere hits the ideal balance of festive and appropriate.
How can I make Grinch nail art last longer?
Start with clean, dry nails and a proper base coat, keep color layers thin, and cap the free edge with every layer including top coat. Seal detailed art by floating the top coat on, then refresh that top coat every two to three days. Wear gloves for washing up and gift-wrapping marathons, and push a drop of cuticle oil around the nails nightly — hydrated nails flex instead of chipping.
Conclusion
Whether you go all in on a grinning face or keep it to a glossy green with one tiny heart, these grinch nail ideas prove the most mischievous character at Christmas also makes the most joyful manicure — and if your heart grows three sizes toward even more sparkle, browse our glittery Christmas nail ideas next. Which design is stealing your Christmas first: the classic green, the painted face, or the cozy sweater set?